Webhooks
Deprecation warning
This module is no longer maintained and no support will be provided for it! Webhooks are now parts of DiSky itself starting 4.15, you can find the new documentation here.
Webhooks Module Wiki
Warning
Webhooks are here to make temporary messages with custom names and avatars. They meant to be not recognizable. Indeed, a webhook doesn't have any TAG neither ID to separate them from others webhooks. Also, this is the only way to provide messages with multiple embeds at the same time.
Warning
Webhooks do not support components! (neither interactions)
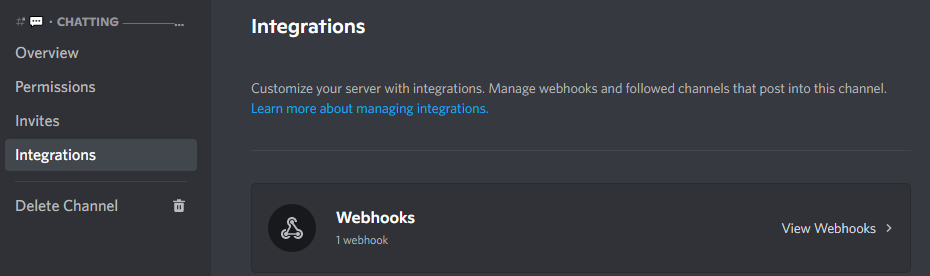
Creating the webhook
In order to create a new webhook, simply navigate inside your wanted channel's settings. Go into the Integrations **** panel, then Webhooks:
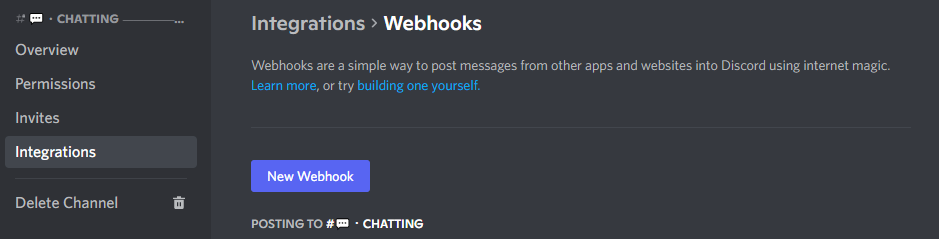
Click on the New Webhook button, and just copy the webhook URL. The name and avatar that are shown here will be editable later:
Registering the client
Once you have your webhook URL, you will have to register the client through DiSky, preferably in an on script load event using the following syntax:
on script load: # 'on load' will execute the code on each script reload.
    register webhook named "<name>" with url "<your webhook url here>"
Info
The <name>part does not represent the webhook's configured name.
It's just a placeholder to reference the loaded client later in the code!
Creating & Sending a custom message
As said in the introduction part of this page, webhooks will have custom messages to send. In addition, of normal message data (such as text content, embeds, and/or files), you will have to define a specific name and avatar URL for the current message.
Here's a simple example with embeds, files, and everything the module can handle currently:
command webhooks: # Any events are accepted of course
    trigger:
       # Even if a webhook have a pre-defined avatar and name, we can change that at every message.
        make a new webhook message:

            set webhook name of builder to "Test" # The new name. It DOES NOT affect the defined name.
            # Here's the avatar and the text content, both optional.
            set webhook avatar of builder to "https://www.pngall.com/wp-content/uploads/4/Coronavirus-PNG-Image.png"
            set webhook content of builder to "This is a test message"

            # Let's make an embed using DiSky's syntax:
            make embed:
                set title of embed to "Hey"
                set embed color of embed to orange

            # Then we just set the current embeds to the embed we just made.
            set webhook embeds of builder to last embed

            # Finally, we can make the client send the message we just made.
            # Because of Discord's limitations, we can only get back the message's ID.
            make client "<name>" send builder and store it in {_msgId}

            # OPTIONAL: Use the 'retrieve message' effect from DiSky in order to get an actual Message.
            send "Message id: %{_msgId}%" to console
Success
Webhooks can send multiple embeds within the same message!