Graphics (2D)
Understanding the allocation system
When you create graphics, you need to allocate them. This means that you need to create a new graphics object, and then you need to draw on it.
When you're done drawing, you need to dispose of it. This must be done by yourself in order to avoid memory leaks.
Creating a graphics
You can easily create & store 2D graphics with the following expression:
Danger
As explained above, you need to dispose of the graphics when you're done drawing on it. You can do so with the following effect:
You won't be able to draw on the graphics after disposing it.
Drawing on a graphics
Shapes
You can draw several shapes on a graphics. You first need to create and configure the shape itself, then draw it at the specified location.
When you have a shape, you can draw it using the following effect:
Info
The colors are Skript color. You can however use color from rgb to create a color from RGB values.
For these example, we'll have a blank (transparent) image of 100x100 pixels. Also, anti-aliasing is enabled and the stroke is set to a width of 5.


Using Brushes
Instead of simple colors, you can use brushes to create more complex fills for your shapes. Brushes allow you to create gradients, patterns, textures, and other visual effects.
Solid Color Brush
The most basic brush is a solid color:
set {_brush} to new solid brush with color red
set {_shape} to new rectangle with width 80 and height 80 and brush {_brush}
Gradient Brushes
Gradient brushes create a smooth transition between multiple colors:
Pattern Brushes
Pattern brushes create repeating patterns:
Hatch Brushes
Hatch brushes create line-based patterns:
Special Effect Brushes
These brushes create more complex visual effects:
Texture Brush
You can use an existing image as a texture brush:
set {_texture} to image from file "plugins/SkImage2/textures/grass.png"
set {_brush} to new texture brush from {_texture}
set {_shape} to new rectangle with width 80 and height 80 and brush {_brush}
Text
In order to draw a text, you'll have to create its object, configure its properties, and then draw it.
The first thing to do is creating the font that will be used to draw the text. You can create a font with the following expression:
Warning
The font name is case-sensitive. You can find the list of available fonts on your system by using the following expression:
Wants to add a style?
You can add a style to the font by using the following expression:
You can replace the XXX with the following styles:
bolditalicplainbold italic
How to use custom font?
You must load the font before using it. It's best to put the following effect inside a on load or on skript load event:
register text font from file "path/to/font.ttf" # single file
register text font from file "path/to/fonts/" # folder (all files inside will be loaded)
Supported formats are .ttf, .otf and .ttc.
Now that you have a font, you can create the text object:
SkImage2 uses a powerful 'text format' system, therefore you can easily change the text's color by using Minecraft's colors, for example:
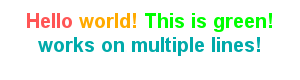
As you can see here, you can use $ to change the color of the text (using Minecraft's color codes, or HEX codes), and %nl% to create a new line. Also, you can specify either the vertical or horizontal alignment of the text.
Supported Color Codes
$0- Black$1- Dark Blue$2- Dark Green$3- Dark Aqua$4- Dark Red$5- Dark Purple$6- Gold$7- Gray$8- Dark Gray$9- Blue$a- Green$b- Aqua$c- Red$d- Light Purple$e- Yellow$f- White
The format is $#000000 where 000000 is the HEX code.
You can now draw the text as when you draw a shape:
Info
If you center the text, the input position will be considered as 'offset' from the center of the text.
Therefore, if you want your text perfectly centered, you'll have to set 0, 0 for the position when drawing the text!
Images
You can also draw images on the graphics. Here again, simply draw the image as when you draw a shape:
Customizing a graphics
Anti-aliasing
Anti-aliasing is a technique used to make the edges of shapes smoother:
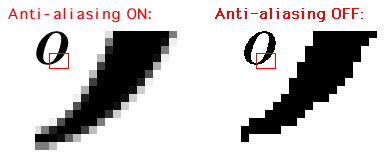
It is disabled by default. If you wish to enable it for both shapes & text, you can simply set the property to true, for instance:
You can simply turn it off by setting it to false.
Info
This will be taken in account for all shapes & text drawn after the property has been set!
Stroke
The stroke is the outline of a shape, or how the line shape is drawn. By default, it has a width of 1 and is filled.
A stroke can have several properties:
width: the width of the stroke (in pixel)cap(optional): the cap of the stroke. Can bebutt,roundorsquare. Defaults toround.join(optional): the join of the stroke. Can bebevel,miterorround. Defaults toround.mitter limit(optional): the mitter limit of the stroke. Defaults to 10.dash array(optional): the dash array of the stroke. Defaults tonone(aka full line).dash phase(optional): the dash phase of the stroke. Defaults to 0.
Here's some example code when drawing a rectangle: (anti-aliasing is enabled)